By using this site, you agree to the Privacy Policy and Terms of Use.
Accept
Weekly DailyWeekly Daily
Notification Show More
Latest News
Shridhar Mamidalaa Is Redefining Sustainable Architecture in India with Technology and Elegance
July 26, 2025
From Churu to the Nation – Rakesh Kumar Launches ‘Vision Wali Baat’ Podcast with MLA Dungar Ram Gedar as the First Guest
July 24, 2025
Dr.N’S Suvarnprashan : An All-Natural Ayurvedic Elixir Rewriting The Immunity and Wellness Story of Children.
July 24, 2025
Transform Your Business with SR-Wave:The Future of Digital Innovation Starts Here
July 24, 2025
Raaswin Group Set to Appoint Visionary CEO for Lucia Financial Services India
July 23, 2025
Aa
  • Home
  • Insider
  • Politics
  • Startup
  • Discover
  • Brand Stories
Reading: How to Set Up the IKEA MALM Bed Frame
Share
Aa
Weekly DailyWeekly Daily
  • ES Money
  • U.K News
  • The Escapist
  • Entertainment
  • Politics
  • Technology
  • Insider
Search
  • Home
  • Insider
  • Politics
  • Startup
  • Discover
  • Brand Stories
Follow US
Home » Blog » How to Set Up the IKEA MALM Bed Frame
Home

How to Set Up the IKEA MALM Bed Frame

WM Team
WM Team Published June 12, 2023
Last updated: 2023/06/12 at 1:40 PM
Share
SHARE

The IKEA MALM bed frame is a popular choice for its sleek design and functionality. Here’s a step-by-step guide on how to set it up:

  1. Unboxing and organizing: Start by unboxing all the components of the MALM bed frame. Lay them out in an organized manner to easily identify and access each part.
  2. Prepare the tools: Ensure you have all the necessary tools, which usually include an Allen wrench and a screwdriver. Make sure they’re the right sizes for the screws and bolts provided.
  3. Assemble the headboard: Begin by attaching the headboard to the side panels. Align the holes on the headboard and the panels and secure them using the screws provided. Use the Allen wrench to tighten the screws.
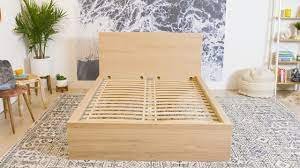
  4. Install the bed slats: Place the bed slats evenly on the side panels. Ensure they are aligned and secure them with the provided fasteners. Follow the instructions carefully to determine the correct placement.
  5. Attach the midbeam and support beam: Locate the midbeam and attach it to the designated slots on the side panels. Insert the support beam into the midbeam to provide additional stability.
  6. Tighten and adjust: Once all the components are in place, use the provided tools to tighten all the screws and bolts. Ensure everything is secure and stable before using the bed.

You Might Also Like

Embracing New Beginnings: Welcoming 2024 with Joy and Hope

Rajiv Gandhi Assassination Convict: Controversy

Churachandpur Unrest: Manipur Enforces Prohibitory Orders Amid Ethnic Clashes

McLaren Introduces GTS as Next-Gen GT Supercar: A Power-Packed Upgrade

WHO Designates JN.1 Coronavirus Strain as ‘Variant of Interest’

TAGGED: Furniture, IKEA, Weekly Daily, weeklymail, weeklymail.in
WM Team June 12, 2023
Share this Article
Facebook Twitter Whatsapp Whatsapp LinkedIn Email Copy Link Print
Leave a comment

Leave a Reply Cancel reply

You must be logged in to post a comment.

You Might Also Like

Fashion

Embracing New Beginnings: Welcoming 2024 with Joy and Hope

December 31, 2023
rajiv gandhi
news

Rajiv Gandhi Assassination Convict: Controversy

December 27, 2023
A child with Flag
Politics

Churachandpur Unrest: Manipur Enforces Prohibitory Orders Amid Ethnic Clashes

December 23, 2023
DiscoverInnovation

McLaren Introduces GTS as Next-Gen GT Supercar: A Power-Packed Upgrade

December 20, 2023

2023 © Weekly Mail Network. All Rights Reserved.

Removed from reading list

Undo
Welcome Back!

Sign in to your account

Lost your password?